10 मिनट में HTML से Website Template Design कैसे बनायें?
अपने Website के visitors को attract करने के लिये सबसे पहली और जरूरी चीज होती है वेबसाईट की design, अगर आपकी वेबसाईट दिखने में अच्छी और user friendly नही होगी तो आपके audience आपके site प्रति रूची नही दिखायेंगे। तो आज हम इस post में HTML के table tag से website template design करना सीखेंगे।

सबसे पहले तो मैं आपको बताना चाहूंगा कि HTML table से template design करना बहुत ही पुराना तरीका है जिसका उपयोग आजकल बहुत कम किया जाता है
क्योंकि इससे हम Responsive Template मतलब ऐसा template नही बना सकते जो की सभी devices जैसे कि mobile, smart phone, tablet, laptop, desktop आदि में एक समान दिखाई दे।
लेकिन आप चिंता न करें, हम आगे इसी blog में आपको Responsive Template design करना जरूर सिखायेंगे।
यह भी पढ़ें:
- Responsive Web Design क्या है और आपको इसकी जरूरत क्यों है?
- Media Queries से Responsive Website कैसे बनायें
- Bootstrap से Responsive Navigation Menu कैसे बनायें
फ़िलहाल इस tutorial में हम table tag से template design करना सीखेंगे ये method पुराना जरूर है लेकिन अगर आपको पता है कि आपके target visitors यानी के आपके website को visit करने वाले desktop या large screens का ही use करते हैं तो आज भी इस method का उपयोग किया जा सकता है
Contents
Website Layout vs. Template
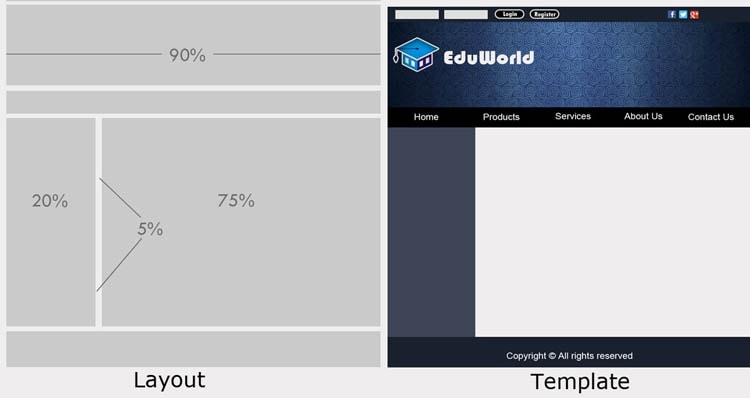
यहां पर आपको layout और template में confusion हो सकता है, कई बार इन दोनो को एक ही समझा जाता है लेकिन दोनो के बीच थोडा सा difference होता है।
- Layout को हम अपने वेबसाइट के design का structure या ढांचा समझ सकते है जिसमे हम ये तय करते हैं कि हमारे design में कितने sections होंगे यानि के header, menu, sidebar, footer आदि और उनका स्थान व size क्या होगा।
- Template हमारे site के पूरे डिजाइन को represent करता है जिसमें contents को छोड कर layout के साथ-साथ सभी sections के color combination और background images भी शामिल हैं।

Layout plan करना
सबसे पहले हमें site का layout plan करना होगा, हमें ये तय करना होगा की पूरे page की width कितनी होगी header, navigation, footer की height कितनी होगी, sidebar left में होगा या right में आदि।
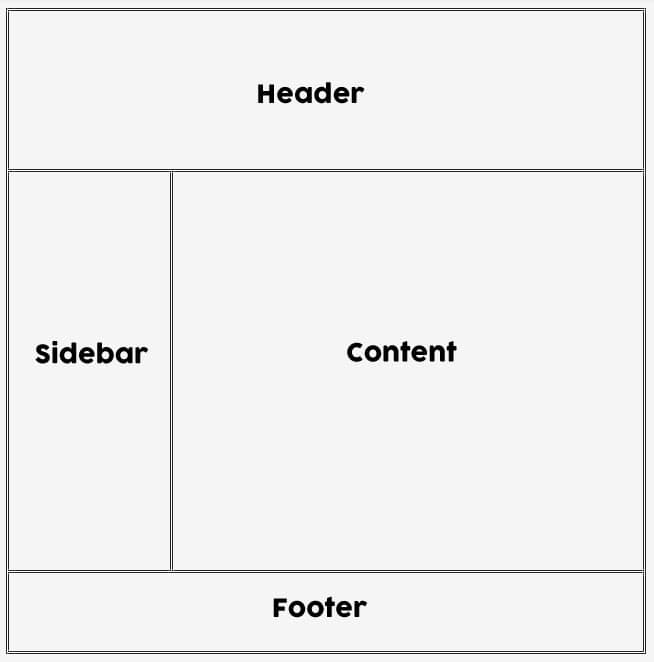
तो यहां पर हम example के लिये एक simple सा layout लेते हैं जिसमें header, sidebar, content और footer होंगे। इसके बाद हम इसमे कुछ background color और image add करेंगे ताकी यह थोडा attractive भी लगे।
Layout बनाना
इससे पहले हमने HTML table बनाना सीखा था, ठीक वैसे ही यहां पर भी हम <table> tag का उपयोग करेंगे लेकिन आपको यहां नीचे दिये कुछ बातों का ध्यान रखना होगा:
- colspan और rowspan पर ध्यान रखें: अगर आप अपने design को sections में divide करते हैं तो आपको colspan और rowspan पर विशेष ध्यान देना चाहिये।
- vlign attribute का use करना: valign एक attribute होता है जिसे हम table के row या column में लगाते हैं ताकि उस row या column के अन्दर के content जैसे text, image आदि की alignment set कर सकें। vlign use नही करने से table के अन्दर के सारे content by default middle से start होंगे। हम यहां header, sidebar, content और footer वाले columns में valign=”top” use करेंगे ताकि उसके अन्दर के text और image top position से start हों ।
Code
तो ये रहा कोड जिससे हम लेआउट डिजाइन करेंगे:
सबसे पहले बिना किसी content, color या image के सिर्फ़ एक टेबल डिजाईन करेंगे जिसके लिये code कुछ ऐसा होगा:
 <table width="100%" border="1" >
 <tr valign="top">
   <td colspan="2"></td>
 </tr>
 <tr valign="top">
   <td width="20%"></td>
   <td></td>
 </tr>
 <tr valign="top">
   <td colspan="2"></td>
 </tr>
 </table>
अब चलिये कोड को समझते हैं:
- सबसे पहले हमने <table> tag लिया जिसमें width=100% किया जिससे पूरे लेआउट का size screen के बराबर हो जायेगा।
- जैसा कि हम देख सकते हैं हमारे Layout में 3 rows हैं जिसमें बीच वाले row में दो columns हैं एक sidebar और एक content के लिये इसलिये हमने 3 बार <tr> tag लिखकर तीन rows create किया।
- First और third वाले rows में header और footer के लिये केवल एक बार <td> tag से column बनाया।
- Second वाले row को दो भाग में divide किया एक sidebar और एक content के लिये जिसके लिये दो बार table data यानि <td> use किया।
- यहां पर विशेष ध्यान देने वाली बात यह है कि second वाले row में दो column हैं लेकिन first row (header) और last row (footer) में सिर्फ़ एक-एक column हैं इसलिये इन दोनो को हम दो column के बराबर span करेंगे। span करने के लिये हमें <td> में colspan=”2” लिखना पडेगा।
Table में Color और Background Image add करना
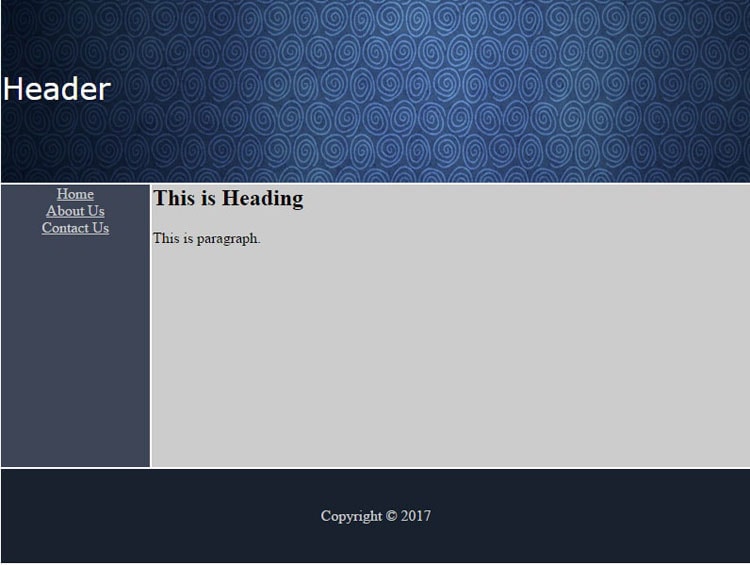
अब हम header में एक background image लगायेंगे, sidebar और footer में color डालेंगे। जैसे की मेरा डिजाईन जो कुछ इस प्रकार दिखाई दे रहा है:

पूरा Code कुछ ऐसा होगा:
<table width="800px" border="0" align="center">
<tr valign="top" background="header.jpg" height="200px">
<td colspan="2" valign="middle"><font color="#ffffff" size="6px" face="Verdana, Geneva, sans-serif">Header</font></td>
</tr>
<tr valign="top" height="300px">
<td width="20%" align="center" bgcolor="#3d4556">
<a href="#"><font color="#CCCCCC">Home</font></a><br>
<a href="#"><font color="#CCCCCC">About Us</font></a><br>
<a href="#"><font color="#CCCCCC">Contact Us</font></a><br>
</td>
<td bgcolor="#CCCCCC"><h2>This is Heading</h2>
<p>This is paragraph.</p>
</td>
</tr>
<tr valign="top" bgcolor="#18212e" height="100px">
<td colspan="2" valign="middle"><p align="center"><font color="#CCCCCC">Copyright © 2017</font><p></td></tr>
</table>
यहां नीचे कुछ बातों पर ध्यान देना आवश्यक है:
- हमने यहां table में align=”center” किया जिससे हमारा पूरा पेज center पर आ जायेगा।
- Header वाले <tr> यानि row में background =”header.jpg” लिखा जिससे header.jpg नाम का image हमारे header के लिये background image बन जायेगा
- ध्यान रहे मैने header.jpg नाम का image लिया है जो कि उसी folder में है जहां हमारा html page है आप दूसरे नाम से भी image ले सकते हैं लेकिन अगर image same folder में नही है तो आपको उसका पूरा location लिखना पडेगा।
- Footer में copyright का चिन्ह दिखाने के लिये © कोड लिखना पडेगा।
तो अब आपने HTML से webpage की template design कर लिया है| यहां शुरुआत में आपको थोड़ी सी परेशानी हो सकती है लेकिन अगर आप थोडा practice करें, एक-एक code और उसके effect पर ध्यान दें तो आप आसानी से ये सीख सकते हैं कि किस कोड का use कब करना हैं।
अब आप भी खुद से एक template design कर के देखें और हो सकते तो हमे अपने डिजाईन का screenshot भी कमेन्ट बॉक्स में भेजें|
अगर आपके मन में इस post से जुड़े कुछ सवाल या आप इसके बारे में कुछ कहना चाहते हैं तो comment के माध्यम से जरूर बतायें।


wow amazing information