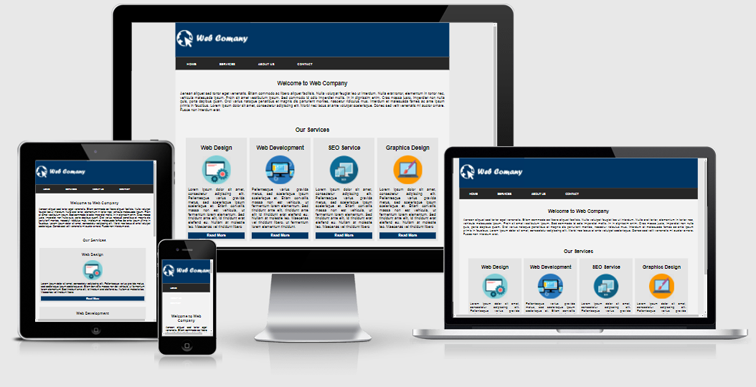
Media Queries से Responsive Website कैसे बनायें
पिछले article में आपने पढ़ा था की responsive web design क्या है और आपको इसकी जरूरत क्यों है? जिसमे आपने पढ़ा होगा की responsive website के क्या-क्या फायदे हैं और आज के समय में यह जरूरी क्यों है|
अब यदि आपने तय कर लिया है की आपको responsive website बनाना सीखना है तो आप बिलकुल सही जगह पर आये हैं|
आज आप इस article में CSS media queries का उपयोग करके step by step तरीके से एक responsive website design करना सीखेंगे|
इस article में हमने जो responsive website design किया है उसे समझने के लिए पहले आपको नीचे दिए गये कुछ बातों की जानकारी होनी जरूरी है:
Contents
Media Queries क्या है?
हम CSS media queries का उपयोग करेंगे इसलिए आपको इसकी जानकारी होनी जरूरी है| हम media queries का उपयोग कर अलग-अलग screen size वाले devices के लिए अलग-अलग CSS styles apply कर सकते हैं|
Viewport meta tag क्या है?
Viewport का मतलब होता है वह area जो की user अपने browser पर देख पाता है|
अगर आपको अपने webpage को mobile optimized बनाना है तो आपको उस पेज के head tag के अन्दर viewport meta tag specify करना होगा|
viewport meta tag किसी large size वाले page को device के width के अनुसार scale down करके screen पर fit कर देता है|
यदि आप बिना viewport specify किये अपने web page को mobile device में run करके देखें तो हो सकता है उस पेज पर media queries apply न हो| ऐसा इसलिए क्योंकि आपका browser device width को समझ ही नहीं पायेगा और ऐसे में media query trigger ही नही होगा|
By default Android या iPhone जैसे mobile devices किसी web page को display करते समय उसे zoom-out कर देते हैं जिससे हो सकता है आपकी site जैसा आप चाहते हैं वैसा दिखाई ना दे|
इन सभी समस्याओं से बचने के लिए Viewport meta का उपयोग करें जिससे आप पेज content की width के अलावा zoom level को भी define कर सकते हैं
तो viewport define करना न भूलें, इसके लिए <head> में जा कर नीचे दिए गया syntax लिखें:
<meta name="viewport" content="width=device-width, initial-scale=1">जहाँ width=device-width पेज की width को device के screen-width के अनुसार set करती है| initial-scale=1 से initial zoom level set किया जाता है|
Responsive Website कैसे बनायें?
अब आप responsive website बनाने के लिए नीचे दिए गये steps को follow करते जाएँ:
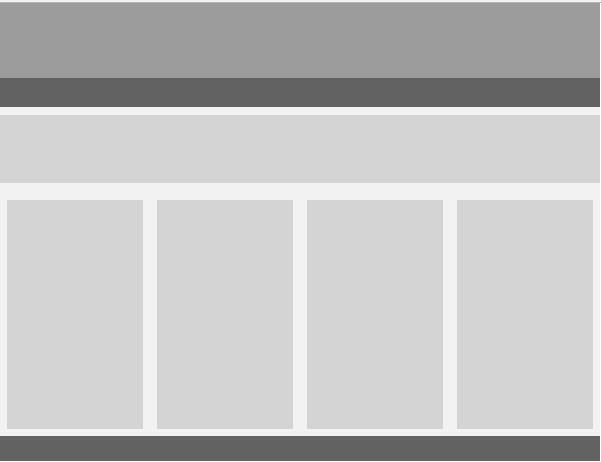
Step 1: सबसे पहले हम नीचे दिए गये image की तरह एक simple सा website layout यानि की structure design करते हैं :
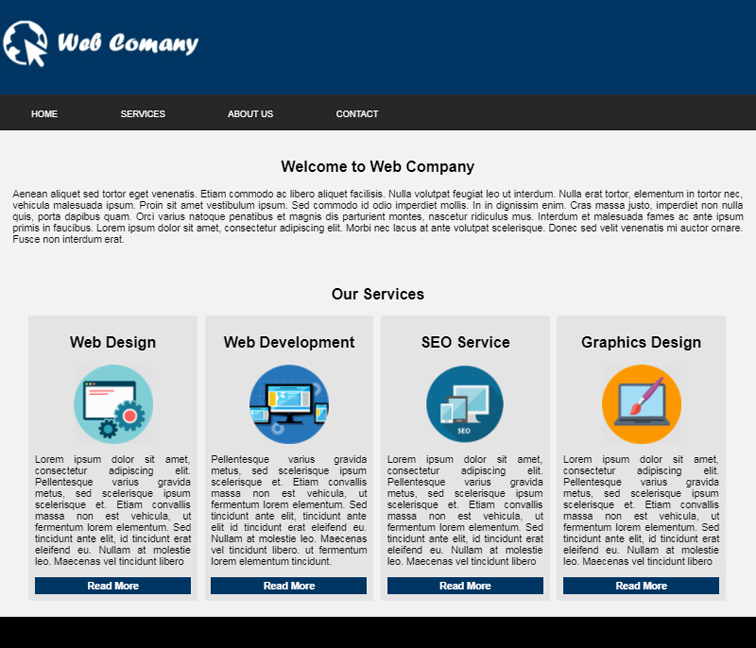
Step 2: अब इस structure के अनुसार design बनाते हैं जो की नीचे दिए गये image की तरह दिखाई देगा:
Step 3: अब इस design को implement करने के लिए इसका एक HTML structure बनाते हैं जो की कुछ इस प्रकार होगा:
<!DOCTYPE html>
<html>
<head>
<title>Responsive Website</title>
</head>
<body>
div id=”wrapper”>
<div id="header"></div>
<div id="nav"></div>
<section id="content">
<div class="row1"></div>
<div class="row2">
<div class="box"></div>
<div class="box"></div>
<div class="box"></div>
<div class="box"></div>
</div>
</section>
<footer></footer>
</body>
</html>Step 4: इस step में header वाले div के अंदर coding करेंगे और img tag से एक logo add करेंगे:
<div id="header">
<img src="header1.jpg">
</div>
Step 5: Navigation के लिए code लिखेंगे, इसके लिए nav id वाले div में menu के लिए un-ordered list बनायेंगे और उसमे menu items add करेंगे:
<div id="nav">
<ul>
<li><a href="#">Home</a></li>
<li><a href="#">Services</a></li>
<li><a href="#">About Us</a></li>
<li><a href="#">Contact</a></li>
</ul>
</div>Step 6: Content add करना शुरू करेंगे, <section> के अंदर एक row add करेंगे, इसके लिए एक div बनायेंगे और उसे class देंगे row1, अब इस div में एक heading और एक paragraph होगा:
<section id="content">
<div class="row1">
<h2>Welcome to Web Company</h2>
<p>Aenean aliquet sed tortor eget venenatis. Etiam commodo ac libero aliquet facilisis. Nulla volutpat feugiat leo ut interdum. Nulla erat tortor, elementum in tortor nec, vehicula malesuada ipsum. Proin sit amet vestibulum ipsum. Sed commodo id odio imperdiet mollis. In in dignissim enim. Cras massa justo, imperdiet non nulla quis, porta dapibus quam. Orci varius natoque penatibus et magnis dis parturient montes, nascetur ridiculus mus. Interdum et malesuada fames ac ante ipsum primis in faucibus. Lorem ipsum dolor sit amet, consectetur adipiscing elit. Morbi nec lacus at ante volutpat scelerisque. Donec sed velit venenatis mi auctor ornare. Fusce non interdum erat.</p>
</div>
</section>
Step 7: <section> में एक और row insert करेंगे, इसके लिए एक div बनायेंगे और उसे row2 नाम का class assign करेंगे, जिसके अंदर 4 boxes होंगे हर box में एक heading, image, paragraph और एक button होगें:
<div class="row2">
<h2>Our Services</h2>
<div class="box">
<h2>Web Design</h2>
<img src="unnamed.png">
<p>Lorem ipsum dolor sit amet, consectetur adipiscing elit. Pellentesque varius gravida metus, sed scelerisque ipsum scelerisque et. Etiam convallis massa non est vehicula, ut fermentum lorem elementum. Sed tincidunt ante elit, id tincidunt erat eleifend eu. Nullam at molestie leo. Maecenas vel tincidunt libero</p>
<a class="button" href="#">Read More</a></div>
<div class="box">
<h2>Web Development</h2>
<img src="icon-responsive-web-design.png">
<p>Pellentesque varius gravida metus, sed scelerisque ipsum scelerisque et. Etiam convallis massa non est vehicula, ut fermentum lorem elementum. Sed tincidunt ante elit, tincidunt ante elit id tincidunt erat eleifend eu. Nullam at molestie leo. Maecenas vel tincidunt libero. ut fermentum lorem elementum tincidunt ante elit.</p>
<a class="button" href="#">Read More</a></div>
<div class="box">
<h2>SEO Service</h2>
<img src="icon-responsive.png">
<p>Lorem ipsum dolor sit amet, consectetur adipiscing elit. Pellentesque varius gravida metus, sed scelerisque ipsum scelerisque et. Etiam convallis massa non est vehicula, ut fermentum lorem elementum. Sed tincidunt ante elit, id tincidunt erat eleifend eu. Nullam at molestie leo. Maecenas vel tincidunt libero</p>
<a class="button" href="#">Read More</a></div>
<div class="box">
<h2>Graphics Design</h2>
<img src="Web_Design-512.png">
<p>Lorem ipsum dolor sit amet, consectetur adipiscing elit. Pellentesque varius gravida metus, sed scelerisque ipsum scelerisque et. Etiam convallis massa non est vehicula, ut fermentum lorem elementum. Sed tincidunt ante elit, id tincidunt erat eleifend eu. Nullam at molestie leo. Maecenas vel tincidunt libero</p>
<a class="button" href="#">Read More</a></div>
</div>
Step 8: Footer के HTML code लिखेंगे:
<div id="footer">
<p>Web Company © Copyright 2017-18</p>
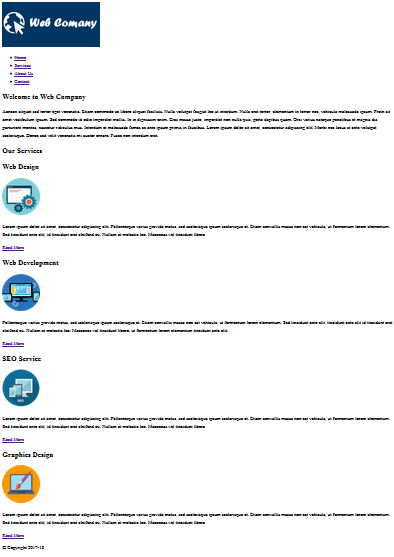
</div>अब हमारा HTML page कुछ इस प्रकार दिखाई देगा:
Step 9: HTML page बनाने के बाद CSS styling करना शुरू करेंगे, style.css नाम से एक file बनायेंगे और उसमे CSS की coding करना शुरू करेंगे| सबसे पहले सभी sections के लिए height-width और background-color specify करेंगे:
body {
  margin: 0;
  padding: 0
}
#wrapper {
  max-width: 1200px;
  background: #f2f2f2;
  margin: 0 auto
}
#header {
  width: 100%;
  height: 150px;
  background: #003664;
}
#nav {
  width: 100%;
  background: #e4e4e4;
  height: 50px;
}
#content {
  width: 100%;
  font-family: Arial, Helvetica, sans-serif;
}
#footer {
  width: 100%;
  height: 50px;
  background: #000;
  clear: both
}
Step 10: Menu design के लिए coding करेंगे
#nav {
  width: 100%;
  background-color: #272727;
  height: 57px;
  background-repeat: repeat;
}
#nav ul {
  float: left;
  list-style: none;
  width: 100%;
}
#nav ul li {
  float: left;
  list-style: none;
  margin-right: 80px;
}
#nav ul li:hover {
  background: #003664;
}
#nav ul li a {
  text-decoration: none;
  font-size: 14px;
  line-height: 16px;
  color: #fff;
  display: block;
  padding: 7px 10px;
  margin-bottom: 1px;
  text-transform: uppercase;
  font-family: Arial, Helvetica, sans-serif;
}
Step 11: CSS class row1 और row2 के लिए coding:
#content .row1 {
  padding: 20px;
  overflow: hidden
}
#content .row2 {
  padding: 10px;
  overflow: hidden
}
Step 12: यह सबसे important step है इस समझना आपके लिए बहुत जरूरी है| इस step में boxes के लिए code लिखेंगे, हमने content के अंदर चार boxes बनायें हैं जिनके लिए box1, box2, box3, और box4 नाम से class बनाया है| इन classes को define करेंगे:
#content .box1, .box2, .box3, .box4 {
  width: 21%;
  padding: 10px;
  background: #e4e4e4;
  float: left;
}
#content .box1, .box2, .box3 {
  margin-right: 1%
}
#content .box1 {
  margin-left: 3%
}
सबसे पहले हमने चारों box के लिए width, padding, background-color set किया और सभी को एक के बाद एक display करने के लिए float:left किया |
सभी boxes के बीच space दिखाने के लिए margin property का उपयोग करेंगे|
margin specify करते समय हमें ध्यान रखना है की हमें चारों बॉक्स को एक ही line में display करना हैं और सभी के बीच बराबर space होने चाहिए|
हमें first वाले box को left से space देना है जिसके लिए margin-left use करेंगे और box1, box2, box3 के लिए margin-right से right side में margin apply करेंगे|
यहाँ पर ध्यान देने वाली बात है की हम last वाले box के लिए को margin use नही करेंगे|
Step 13: Box के अंदर वाले image को center पर लायेंगे और button के लिए coding करेंगे:
Image को center में display करने के लिए हमें इसे display:block; से block element बनाना होगा उसके बाद margin:0 auto; से center करना होगा:
#content .row2 img{display: block; margin: 0 auto;}Read more button बनाने के लिए अलग से class बनाया है जिसे define करेंगे:
.button {
  display: block;
  background: #003664;
  padding: 5px;
  color: #fff;
  text-decoration: none;
  font-family: arial;
  font-weight: 700;
  text-align: center
}
Step 14: Responsive design बनाने के लिए अलग-अलग devices के लिए media query breakpoints बनायेंगे|
हम यहाँ पर अलग-अलग screen sizes के अनुसार तीन breakpoints का use करेंगे:
- @media only screen and (max-width:980px) : ऐसे devices जिनकी screen-width 980px या उससे कम है
- @media only screen and (max-width:768px) : 768px या उससे कम वाले devices के लिए
- @media only screen and (max-width:320px): छोटे screen जैसे mobile, smartphones आदि के लिए
Step 15: अब इन तीनो media query breakpoints के लिए styling करते हैं| हमने सारे codes लिखने की जरूरत नही है, सिर्फ उन्ही elements के लिए code लिखेंगे जिसके लिए हमें changes करना है:
  @media only screen and (max-width:980px) {
  #content .box1, .box2, .box3, .box4 {
    width: 43%;
    margin-top: 3%
  }
  #content .box1, .box3 {
    margin-right: 3%
  }
  #content .box1, .box3 {
    margin-left: 3%
  }
}
@media only screen and (max-width:768px) {
  #content .box1, .box2, .box3, .box4 {
    width: 90%;
    margin: 2%;
  }
}
@media only screen and (max-width:320px) {
  #content .box {
    width: 100%;
    margin: 5px;
  }
}
इन codes का मतलब यह है की जब screen की size define किये गये max-width के बराबर या उससे कम होगी तब curly braces के अंदर वाले codes execute हो जायेंगे|
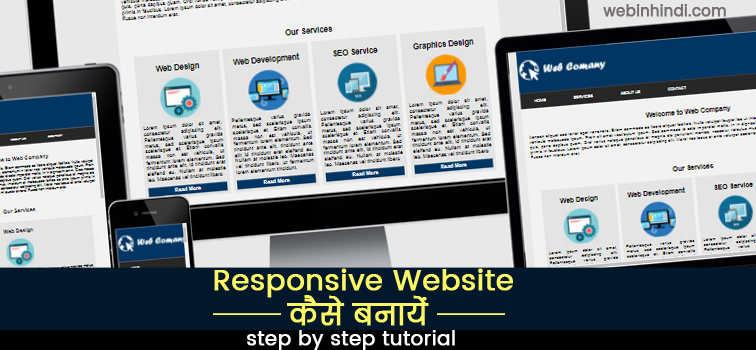
Step 15: अब आपका responsive website तैयार है| जो की अलग-अलग devices पर नीचे दिए गए image की तरह दिखाई देगा:
Responsive Design के लिए Final HTML CSS Code
आप इस design की पूरी HTML और CSS coding नीचे देख सकते हैं:
HTML Code:
<!DOCTYPE html>
<html>
<head>
<meta content="width=device-width, initial-scale=1.0" name="viewport">
<link href="style.css" rel="stylesheet" type="text/css">
<title>Responsive website using media queries</title>
</head>
<body>
<div id="wrapper">
<div id="header"><img src="header1.jpg"></div>
<div id="nav">
<ul>
<li><a href="#">Home</a></li>
<li><a href="#">Services</a></li>
<li><a href="#">About Us</a></li>
<li><a href="#">Contact</a></li>
</ul>
</div>
<section id="content">
<div class="row1">
<h2>Welcome to Web Company</h2>
<p>Aenean aliquet sed tortor eget venenatis. Etiam commodo ac libero aliquet facilisis. Nulla volutpat feugiat leo ut interdum. Nulla erat tortor, elementum in tortor nec, vehicula malesuada ipsum. Proin sit amet vestibulum ipsum. Sed commodo id odio imperdiet mollis. In in dignissim enim. Cras massa justo, imperdiet non nulla quis, porta dapibus quam. Orci varius natoque penatibus et magnis dis parturient montes, nascetur ridiculus mus. Interdum et malesuada fames ac ante ipsum primis in faucibus. Lorem ipsum dolor sit amet, consectetur adipiscing elit. Morbi nec lacus at ante volutpat scelerisque. Donec sed velit venenatis mi auctor ornare. Fusce non interdum erat.</p>
</div>
<div class="row2">
<h2>Our Services</h2>
<div class="box1">
<h2>Web Design</h2>
<img src="unnamed.png">
<p>Lorem ipsum dolor sit amet, consectetur adipiscing elit. Pellentesque varius gravida metus, sed scelerisque ipsum scelerisque et. Etiam convallis massa non est vehicula, ut fermentum lorem elementum. Sed tincidunt ante elit, id tincidunt erat eleifend eu. Nullam at molestie leo. Maecenas vel tincidunt libero</p>
<a class="button" href="#">Read More</a></div>
<div class="box2">
<h2>Web Development</h2>
<img src="icon-responsive-web-design.png">
<p>Pellentesque varius gravida metus, sed scelerisque ipsum scelerisque et. Etiam convallis massa non est vehicula, ut fermentum lorem elementum. Sed tincidunt ante elit, tincidunt ante elit id tincidunt erat eleifend eu. Nullam at molestie leo. Maecenas vel tincidunt libero. ut fermentum lorem elementum tincidunt.</p>
<a class="button" href="#">Read More</a></div>
<div class="box3">
<h2>SEO Service</h2>
<img src="icon-responsive.png">
<p>Lorem ipsum dolor sit amet, consectetur adipiscing elit. Pellentesque varius gravida metus, sed scelerisque ipsum scelerisque et. Etiam convallis massa non est vehicula, ut fermentum lorem elementum. Sed tincidunt ante elit, id tincidunt erat eleifend eu. Nullam at molestie leo. Maecenas vel tincidunt libero</p>
<a class="button" href="#">Read More</a></div>
<div class="box4">
<h2>Graphics Design</h2>
<img src="Web_Design-512.png">
<p>Lorem ipsum dolor sit amet, consectetur adipiscing elit. Pellentesque varius gravida metus, sed scelerisque ipsum scelerisque et. Etiam convallis massa non est vehicula, ut fermentum lorem elementum. Sed tincidunt ante elit, id tincidunt erat eleifend eu. Nullam at molestie leo. Maecenas vel tincidunt libero</p>
<a class="button" href="#">Read More</a></div>
</div>
</section>
<div id="footer">
<p>© Copyright 2017-18</p>
</div>
</div>
</body>
</html>CSS Code:
/* ================ Basic Structure ============= */

body {
  margin: 0;
  padding: 0
}
#wrapper {
  max-width: 1200px;
  background: #f2f2f2;
  margin: 0 auto
}
#header {
  width: 100%;
  height: 150px;
  background: #003664;
}
#nav {
  width: 100%;
  background: #e4e4e4;
  height: 50px;
}
#content {
  width: 100%;
  font-family: Arial, Helvetica, sans-serif;
}
#footer {
  width: 100%;
  height: 50px;
  background: #000;
  clear: both
}

/* ============ navigation ============= */

#nav {
  width: 100%;
  background-color: #272727;
  height: 57px;
  background-repeat: repeat;
}
#nav ul {
  float: left;
  list-style: none;
  width: 100%;
}
#nav ul li {
  float: left;
  list-style: none;
  margin-right: 80px;
}
#nav ul li:hover {
  background: #003664;
}
#nav ul li a {
  text-decoration: none;
  font-size: 14px;
  line-height: 16px;
  color: #fff;
  display: block;
  padding: 7px 10px;
  margin-bottom: 1px;
  text-transform: uppercase;
  font-family: Arial, Helvetica, sans-serif;
}

/* =============== Contents =========== */

#content .box1, .box2, .box3, .box4 {
  width: 21%;
  padding: 10px;
  background: #e4e4e4;
  float: left;
}
#content p {
  text-align: justify
}
#content h2 {
  text-align: center
}

/* ----------row1 and row2----------*/

#content .row1 {
  padding: 20px;
  overflow: hidden
}
#content .row2 {
  padding: 10px;
  overflow: hidden
}

/*-----------boxes---------*/

#content .box1, .box2, .box3 {
  margin-right: 1%
}
#content .box1 {
  margin-left: 3%
}
#content .row2 img {
  display: block;
  margin: 0 auto;
}

/*----------Read More Button--------*/

.button {
  display: block;
  background: #003664;
  padding: 5px;
  color: #fff;
  text-decoration: none;
  font-family: arial;
  font-weight: 700;
  text-align: center
}

/*================= Media Query Breakpoint 1 ============*/

@media only screen and (max-width:980px) {
  #content .box1, .box2, .box3, .box4 {
    width: 43%;
    margin-top: 3%
  }
  #content .box1, .box3 {
    margin-right: 3%
  }
  #content .box1, .box3 {
    margin-left: 3%
  }
}

/*================= Media Query Breakpoint 2 ============*/

@media only screen and (max-width:768px) {
  #content .box1, .box2, .box3, .box4 {
    width: 90%;
    margin: 2%;
  }
  #nav {
    width: 100%
  }
}

/*================= Media Query Breakpoint 3 ============*/

@media only screen and (max-width:320px) {
  #content .box1, .box2, box3, .box4 {
    width: 100%;
    margin: 5px;
  }
  #header img {
    width: 100%;
  }
}
आगे पढ़ें:
- CSS से Tableless Fixed Layout कैसे Design करें
- Fluid या Liquid Website Layout Design कैसे बनाएं
- CSS3 से अपने Website के लिए Shapes कैसे Design करें
अगर आप ऊपर दिए सारे steps follow करते हैं तो आप बड़ी आसानी से एक responsive website design कर सकते हैं|
आप अपनी आवश्यकता अनुसार इसके layout design में changes भी कर सकते हैं| इसमें यदि कोई परेशानी हो तो हमें जरूर बतायें|
